A focused wheelchair brake maintenance guide covering lever-type vs. push-to-lock selection, five critical failure points, adjust-vs-replace cost modeling, and a bulk procurement checklist. Structured protocols consistently reduce brake-related patient safety incidents by up to 60% across institutional fleets.
wheelchair brake replacement
manual wheelchair brake adjustment
wheelchair brake supplier
01 The Safety Stakes
Why Wheelchair Brake Failure Is the #1 Patient Safety Risk in Hospital Fleets
Tire failures are expensive. Brake failures are dangerous. As detailed in our complete manual wheelchair maintenance guide, brake system degradation is the leading mechanical cause of wheelchair-related patient incidents — accounting for more than two-thirds of reported falls and uncontrolled movements. Unlike a flat tire, which simply immobilizes a wheelchair, a failed brake can send a patient sliding off a ramp or rolling into traffic.
The cost equation is stark: a scheduled wheelchair brake maintenance inspection takes 5–10 minutes and costs nothing in labor, essentially. A preventable fall costs thousands in direct expenses — and far more in institutional liability. Brake maintenance is not optional; it is a patient safety protocol.
02 Brake Selection
Lever Brake vs. Push-to-Lock vs. Attendant Brake: Matching Type to Clinical Environment
Not every wheelchair parking brake is built for the rigors of a clinical environment. If the hardware isn’t matched to the setting, you’re either going to be buried in repair tickets or dealing with preventable safety gaps. Here is the reality of how different brake types perform in the high-traffic scenarios we see in the field.
| Brake Type | Best Environment | Maintenance Demand | Service Life |
|---|---|---|---|
| Lever Brake (Standard) | General hospital wards, nursing homes, and outpatient clinics | Quarterly cable tension check; annual pad inspection | 18–24 months |
| Push-to-Lock Brake | ICU, post-surgical wards, high patient-turnover areas | Semi-annual function test; no cable adjustment needed | 24–36 months |
| Attendant Brake | Transit, ramp-heavy facilities, caregiver-assisted transport | Annual cable inspection; immediate check after ramp use | 3–5 years (cable) |
| Push-to-Lock (High-load) | Bariatric units, rehabilitation centers, and high-frequency rotation fleets | Lowest maintenance — no cable, no pad wear to track | 36+ months |
For most institutional buyers, lever brakes remain the default — they are universally understood by staff, easy to adjust in the field, and cost-effective to replace. Push-to-lock brakes make strong economic sense in high-turnover environments where cable slack from repeated use compounds quickly. Match the brake type to your actual operational pattern, not your budget sheet.

03 Failure Analysis
5 Common Wheelchair Brake Failure Points & How to Prevent Each One
Every brake failure we encounter in the field traces back to one of five root causes. Each is entirely preventable with a structured wheelchair brake maintenance protocol — and each has a clear, low-cost intervention window before it becomes a safety incident:
The most common failure mode. Brake cables stretch gradually under repeated use, creating progressive slack that reduces holding force. Symptom: the lever travels further than usual before engaging. Fix: re-tension at the barrel adjuster — a 3-minute procedure requiring no tools. Replace the cable entirely at 24 months regardless of apparent condition. Cable cost: $1.50–$3.00 each.
Vibration from daily transport — door thresholds, elevator gaps, outdoor paths — gradually backs out the two bolts that fix the brake assembly to the frame. A loose brake bracket shifts position under load, causing inconsistent engagement or complete disengagement. Prevention: torque check at 4–5 Nm every 90 days. Cost: zero — it takes 90 seconds with a wrench.
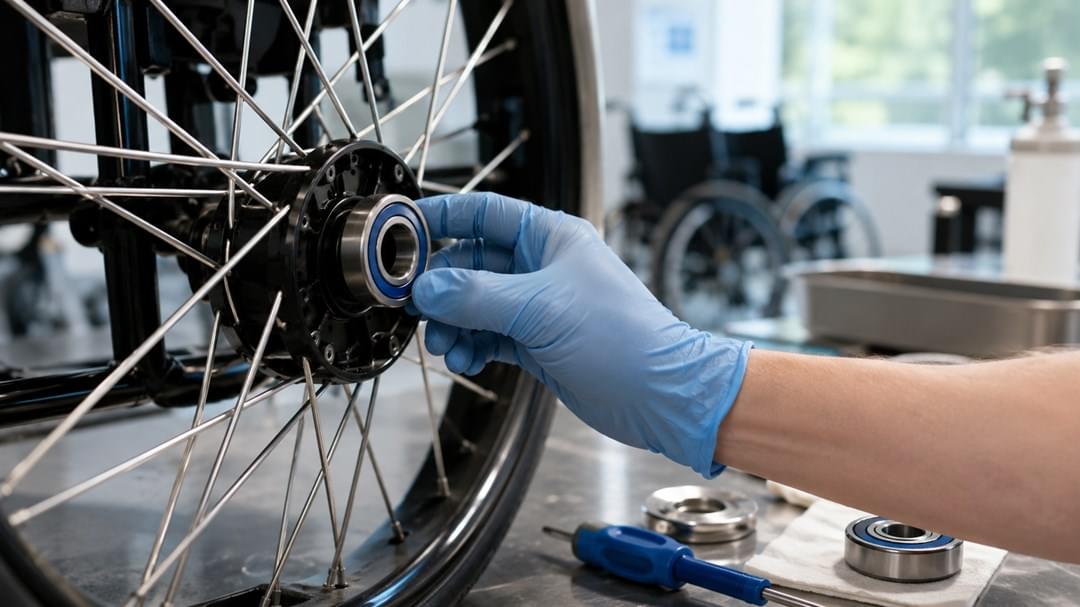
Friction pads wear down against the tire surface over time. On pneumatic rear tires, pad wear accelerates when tire pressure is low — the softer tire surface increases contact area and abrasion rate. Inspect pad thickness every 6 months; replace when surface depth drops below 2mm. Pad sets cost $3–$6 per wheelchair and take 10 minutes to swap.
A single impact — wheelchair tipped sideways, collision with a door frame, rough handling during transport — can bend the lever arm out of alignment. Even 3–4mm of lateral displacement changes the engagement angle enough to cause either grabbing or premature release. Visual inspection during every service round catches this early. Replacement lever: $4–$8.
In wet environments — shower rooms, hydrotherapy areas, outdoor transit — the pivot pin connecting the lever to the brake bracket oxidizes and seizes. A corroded pivot produces a stiff, notchy lever action that caregivers learn to compensate for rather than report. Left untreated, the pin eventually freezes entirely. Prevention: Apply a pea-sized amount of lithium grease to the pivot every 90 days. Total material cost per wheelchair: under $0.05 per treatment cycle.

04 Cost Model
Adjust vs. Replace: A Cost Decision Framework for Wheelchair Brake Replacement
Applying the 50% repair-vs-replace rule from our lifecycle guide to brake decisions produces a clear, field-tested framework. The key insight: repeated adjustments to a failing component accumulate hidden labor costs that quickly surpass replacement cost.
| Cable re-tension (field adjustment) | $0 parts + $8–12 labor = $8–12 total |
| Cable replacement (single) | $2–3 parts + $10 labor = $12–13 total |
| Brake pad set replacement | $4–6 parts + $10 labor = $14–16 total |
| Full brake assembly replacement | $10–18 parts + $15 labor = $25–33 total |
| Bulk brake kit order (50+ units) | 15–20% discount on parts + scheduled replacement = lowest fleet TCO |
The decision rule is simple: if you’re adjusting the same hospital wheelchair brake more than twice a year, it’s reached the end of its service life. At that point, you’re just throwing good labor after bad. With tech time costing $8–12 per visit, those two quick fixes effectively pay for a brand-new assembly. The most efficient fleet managers avoid the “reactive repair” trap; they opt for planned batch replacements during scheduled checks rather than waiting for a third failure.
05 Satcon Brake Configurations
Satcon Wheelchair Brake Options: Standard & Custom for B2B Buyers
Every hospital wheelchair brake failure we encounter in the field traces back to one of five root causes. Each is entirely preventable with a structured maintenance protocol — and each has a clear, low-cost intervention window before it becomes a safety incident.
Fitted as standard on all Satcon manual wheelchair models. Compatible with both 22″ and 24″ rear wheels. Stainless steel cable, chrome lever arm, aluminum bracket. Field-adjustable via barrel adjuster without tools.
Available as standard fitment on high-usage models or as a field-upgrade kit for existing fleet units. No cable required — direct cam-action on rim. Preferred by ICU and post-surgical ward managers for its zero-cable-slack design.
Anti-corrosion coating for wet/shower environments, extended lever arms for bariatric models, dual-cable attendant brakes for ramp-heavy facilities. Full OEM customization available from 50-unit orders. Spare parts supplied without MOQ minimum.

06 Procurement Checklist
Bulk Brake Component Procurement: 5 Questions Every Buyer Must Ask
Before your next wheelchair brake replacement bulk order, send these five questions to your supplier. The answers expose everything about long-term reliability and supply chain risk:
1
2
3
4
5
Need a Reliable Wheelchair Brake Supplier for Your Fleet?
Satcon Medical supplies complete wheelchair brake kits — lever, cable, pads, and hardware — to distributors and healthcare facilities in 30+ countries. Standard sizes in stock. Custom configurations for wet environments available. Get a quote within 24 hours.
WhatsApp: +86 183 3183 3767 | MOQ: 50 brake kits | Lead time: 7–15 days